Recent Water Damage Posts
Rapid Response to Water Damage: Why Time is of the Essence
6/12/2024 (Permalink)
 Remember, when it comes to water damage, time is of the essence. Don't delay – call SERVPRO today!
Water damage can wreak havoc on your property, causing structural damage, mold growth, and even health hazards if left untreated. Whether it's a burst pipe, a leaking roof, or a flood, the key to minimizing the damage is a rapid response. At SERVPRO®, we understand the urgency of the situation, and that's why we prioritize swift action when it comes to water damage restoration. In this blog post, we'll explore why time is of the essence when it comes to addressing water damage and how our rapid response can make all the difference.
Preventing Further Damage
When water infiltrates your property, it doesn't just stay in one place. It seeps into walls, floors, and furniture, causing extensive damage along the way. The longer water sits, the more damage it causes, leading to warped wood, deteriorated drywall, and compromised structural integrity. By responding quickly to water damage, we can mitigate further damage and save you from costly repairs down the line.
Mold Prevention
One of the biggest risks associated with water damage is mold growth. Mold can start to develop within 24 to 48 hours of water exposure, posing serious health risks to you and your family. Our rapid response ensures that we can dry out the affected areas promptly, reducing the likelihood of mold growth and safeguarding your indoor air quality.
Preserving Belongings
Water damage doesn't just affect the structure of your property; it can also ruin your belongings. Furniture, electronics, and personal items can sustain irreversible damage if not addressed quickly. Our team is equipped with the expertise and tools necessary to salvage as much as possible, helping you minimize losses and preserve your cherished possessions.
Minimizing Downtime
Dealing with water damage can disrupt your daily life or business operations. The longer it takes to address the issue, the more downtime you'll experience. Our rapid response ensures that we can get your property back to its pre-damaged condition as quickly as possible, minimizing disruptions and allowing you to resume normal activities sooner.
Insurance Considerations
Prompt action is not only crucial for mitigating damage but also for insurance purposes. Most insurance policies require policyholders to take immediate action to prevent further damage after a water-related incident. By contacting us promptly, you can demonstrate your commitment to minimizing losses and expedite the insurance claims process.
At SERVPRO, we understand that water damage can be a stressful and overwhelming experience. That's why we're committed to providing fast, reliable, and professional water damage restoration services. Our team is available 24/7 to respond to emergencies promptly, ensuring that your property is in good hands from start to finish. Don't wait until it's too late – contact us at the first sign of water damage, and let us help you restore your property to its former glory.
Safeguarding Your Home: Effective Strategies Against Flash Floods and Sudden Storms
2/6/2024 (Permalink)
Flash floods and sudden storms can pose a significant threat to your home and personal safety. Taking proactive measures to protect your home against the damaging effects of these natural disasters is crucial. In this blog post, we will explore practical tips and strategies to help safeguard your home and family from the destructive power of flash floods and sudden storms.
Understand the Risks
Educate yourself about the risks associated with flash floods and sudden storms in your area. Research historical data, consult local authorities, and stay updated on weather alerts. Be aware of the warning signs, such as rapidly rising water levels or heavy rainfall, to take immediate action if needed.
Maintain Good Drainage
Ensure your home's drainage system is working effectively. Clean and unclog gutters, downspouts, and drains regularly to prevent blockages. Redirect downspouts away from the foundation of your home to avoid water pooling and potential structural damage.
Elevate Vulnerable Items
Identify and elevate items susceptible to water damage, such as electronics, important documents, and sentimental belongings. Store them on higher floors or utilize waterproof containers. This precautionary measure can help minimize potential loss in the event of a flood or storm.
Fortify Doors and Windows
Inspect all doors and windows for any gaps or vulnerabilities that could allow water to enter your home. Install weatherstripping or silicone sealant to provide extra protection against water penetration. Consider reinforcing doors and windows with storm shutters or impact-resistant glass.
Install Sump Pumps and Backflow Valves
Consider installing a sump pump in your basement or low-lying areas prone to flooding. This device helps remove excess water before it can cause significant damage. Additionally, installing backflow valves in your sewer or drainage lines can prevent sewage backup during heavy rainfall or flooding.
Create an Emergency Preparedness Kit
Assemble an emergency kit containing essential supplies such as non-perishable food, drinking water, flashlights, batteries, a first aid kit, and a battery-powered radio. Keep the kit in an easily accessible location in case of sudden storms and power outages.
Develop an Evacuation Plan
Establish an evacuation plan with your family and practice it regularly. Identify evacuation routes, emergency shelters, and a safe meeting place outside of flood-prone areas. Assign responsibilities to each family member and ensure everyone understands the plan.
Consult with Insurance Providers
Review your homeowner's insurance policy to understand the coverage for flood and storm damage. Consider adding flood insurance, as it is typically not included in standard policies. Consult with your insurance provider to assess your coverage levels and make any necessary adjustments to adequately protect your home.
By understanding the risks, maintaining good drainage, fortifying doors and windows, and implementing precautions such as sump pumps and backflow valves, you can significantly reduce the impact of flash floods and sudden storms on your home. Developing an emergency plan and staying informed will help ensure your family's safety during these unpredictable natural events.
Balancing Restoration and Preservation With Water-Damaged Historical Homes
10/15/2023 (Permalink)
 With careful restoration efforts, these architectural treasures can continue to tell their stories for generations to come.
Preserving the historical integrity and authenticity of a home is typically a top priority for homeowners and preservation organizations. Stripping away original features or materials can diminish its historical and aesthetic value. While water damage can threaten the structural integrity and beauty of a historical/old home, it is possible to find a balance that allows for restoration while preserving the unique qualities that make these homes so special.
The Impact of Water Damage on Historical/Old Homes
Water damage poses several risks to historical/old homes. It can weaken the foundation, compromise the stability of walls, floors, and ceilings, and even lead to structural collapse. Restoration efforts must prioritize structural integrity to ensure the home remains safe and sound.
Water damage creates an ideal environment for mold growth and wood rot, which can further deteriorate the structure and compromise indoor air quality. Addressing mold and rot issues promptly is vital to safeguard the home's integrity and the health of its occupants.
Water damage can stain or warp woodwork, dissolve plaster, peel paint, or damage ornate detailing, resulting in a loss of historical charm and beauty. Preserving and restoring these unique features require careful attention to detail and expertise.
Strategies for Balancing Restoration with Preservation
Assessment and Documentation: Begin by assessing the extent of water damage and documenting the affected areas. Identify the historical features, original materials, and unique architectural elements that should be preserved, and make note of any irreparable damage that may require replacement.
Consult with Preservation Experts: Seek guidance from professionals with experience in preserving historical/old homes. Preservation architects, historic preservation contractors, and conservation specialists can provide expert advice on appropriate restoration techniques while ensuring the home's historical authenticity is maintained.
Selective Restoration: Prioritize restoration efforts on preserving original elements, such as antique fixtures, ornamental details, vintage molding, and decorative finishes. Whenever possible, opt for restoration techniques that repair and salvage instead of replacement.
Use Historical Materials: When replacing damaged materials, choose materials that match the historical period and character of the home. Salvaged or reclaimed materials can help maintain authenticity, while modern materials can be used discreetly in areas where historical accuracy is less critical.
Specialized Restoration Methods: Historical homes often require specialized restoration techniques that cater to their unique construction, design, and materials. Be sure to hire professionals who have experience working with historical homes and are well-versed in these specialized restoration methods.
Regular Maintenance and Prevention: Implementing regular maintenance and preventative measures, such as proper drainage and gutter systems, regular inspections, and timely repairs, can help prevent water damage and ensure the ongoing preservation of your historical/old home.
Water damage poses a significant threat to the preservation of historical/old homes, but striking a balance between restoration and preservation is vital. By taking a thoughtful and measured approach, consulting with preservation experts, prioritizing the preservation of unique features, using historical materials, and implementing regular maintenance and prevention strategies, it is possible to restore a water-damaged historical/old home while preserving its historical integrity and charm. With careful restoration efforts, these architectural treasures can continue to tell their stories for generations to come.
Drip No More: A Guide to Fixing a Leaky Faucet
7/18/2023 (Permalink)
A leaky faucet is not only annoying with its incessant dripping sound but also wastes water and can lead to increased utility bills. Fortunately, fixing a leaky faucet is a common household repair that you can tackle on your own. In this blog post, we will provide you with a step-by-step guide on how to fix a leaky faucet and put an end to the incessant drips.
Step 1: Gather the necessary tools and materials
Before you begin, gather the required tools and materials. These typically include an adjustable wrench, screwdrivers (both flathead and Phillips), replacement parts (such as O-rings, washers, or cartridges), plumber's tape, and a cloth or towel to protect the surface around the faucet.
Step 2: Turn off the water supply
Locate the water shut-off valves under the sink and turn them off to cut off the water supply. If there are no individual shut-off valves, you may need to shut off the main water supply to your home temporarily.
Step 3: Identify the type of faucet
Different types of faucets have different mechanisms, so it's important to identify the type of faucet you have. The most common types are compression faucets, cartridge faucets, ball faucets, and ceramic-disc faucets. Consult the manufacturer's manual or do some research to determine the specific type of faucet you are working with.
Step 4: Disassemble the faucet
Use the appropriate screwdriver to remove the handles or decorative caps covering the screws on the faucet handles. Unscrew the handles and remove them, exposing the underlying valve mechanism.
Step 5: Replace faulty parts
Inspect the valve mechanism for any damaged or worn-out parts, such as O-rings, washers, or cartridges. These components are often the culprits behind leaks. Carefully remove the faulty parts and replace them with new ones that match the specific make and model of your faucet. Apply plumber's tape to the threads of any connections that require it.
Step 6: Reassemble and test
Once you have replaced the necessary parts, reassemble the faucet in the reverse order of disassembly. Make sure all connections are tight but avoid over-tightening, as it can cause damage. Turn on the water supply and test the faucet for any leaks. If the leak persists, double-check that all components are properly installed and consider seeking professional assistance.
Step 7: Clean and maintain
Regularly clean your faucet to prevent mineral buildup and prolong its lifespan. This includes wiping the surface with a mild cleaner and periodically removing and cleaning the aerator to ensure smooth water flow.
Fixing a leaky faucet is a DIY task that can save you money and reduce water waste. By following these step-by-step instructions, you can effectively repair most common types of leaky faucets. Remember to gather the necessary tools, turn off the water supply, identify the type of faucet, replace faulty parts, and reassemble the faucet before testing for leaks. With a little effort and basic plumbing knowledge, you can bid farewell to the annoying drips and restore your faucet to its fully functional state.
3 Categories of Water Damage
3/9/2023 (Permalink)
Water damage is the most common loss in a home or business. Knowing what category of water loss you are dealing with can help prevent further damages. To help you better understand how to handle water-related issues, we've broken the three categories of water damage for you.
Three Categories of Water Damage
Water damage can be caused by a variety of reasons, sources, and events. You might have a pipe burst in your home or business that causes extensive water damage to the structure and its contents. Flooding due to heavy rain or snow melt can also cause a water loss for your property. Whatever the case may be, there are three main categories of water damage: Category 1, Category 2, and Category 3.
It is important to understand the different categories of water damage in case of a loss in your own home or business. Knowing how the various sources of water damage are categorized into 3 categories can assist you in making the proper decisions to keep yourself, your family, or your employees safe after a water damage event.
Category 1 - Clean Water
Category 1 water damage is the least serious type of water-related damage. Category 1 water comes from a sanitary source and is referred to as "Clean Water." This type of water is considered clean and safe for use in your home. However, it may still cause damage and mold growth if left untreated.
Examples of Category 1 sources are toilet tanks, water supply lines, melting Ice/Snow, and rainwater.
Category 2 - Gray Water
Category 2, also known as "Gray Water" is the second highest level of water damage. This category includes significantly contaminated water that may cause discomfort if you come in contact with it. Category 2 sources include:
- Dishwasher Leaks
- Washing Machine Leaks
- Overflowing Toilet Bowl
- Aquarium Water
Category 3 - Black Water
Category 3 water damage is the most serious type of water damage. It's also known as "Black Water," and it's considered grossly contaminated. All materials that come in contact with Category 3 sources must be removed and replaced.
Examples of Category 3 water sources include:
- Sewage
- Floodwaters
- Seawaters
If your home or business suffers from water damage that could potentially be categorized into one of these three categories: Category 1, Category 2, and Category 3, give the professionals a call at SERVPRO. Each category has a different risk and damage level, so it is important to call immediately for assistance. SERVPRO of Arlington/ Jacksonville East has the experience and expertise for your water damage emergency.
How Do I Replace a Toilet?
11/1/2022 (Permalink)
How To Replace a Toilet
Replacing a toilet is a job you can do yourself, but it's important to take your time and follow the instructions carefully. The process will vary depending on the type of toilet you're replacing and where it's located, but here are some general steps that can help guide you:
1. Cut the old toilet off at the flange.
Remove the old toilet by cutting it off at the flange. Use a hacksaw to cut through any pipe that's in the way, and use a wrench to remove any bolts holding it in place. If you're not sure where these are located, feel free to ask for help from an experienced plumber or handyman.
Once you've removed all of your old fixtures and fittings, use a putty knife or similar tool (like an old credit card or butter knife) to scrape away old wax ring residue from under where your new flange will be installed. This step is important because it ensures that your new wax ring adheres properly when you install it later on in this process. If there was still some leftover residual wax around where you need something sturdy like a "toilet flange," then no amount of glue would keep up with those forces acting against them. Also, don't forget about clearing out any other debris clogging up your drains so nothing gets stuck there later.
Here are some steps to consider to make the job a little bit easier:
- Turn off the water supply to your toilet. This will be either a faucet handle or a shutoff valve.
- Remove the toilet seat and lid by unscrewing them from the bowl.
- Unscrew or loosen any bolts holding the toilet to the floor, then lift it out of place so you can work on it easily. You can use a wrench for this task if necessary, but make sure not to force anything—the old stuff may crumble apart in your hands!
- Be careful not to break any pipes underneath when scraping off the wax seal. Also, clean up any debris from behind where you removed everything else (you might have gotten some dust there).
2. Clean and prep the area.
The second step after removing the toilet is to clean the area. Once you have cleaned out all of that old gunk, it’s time to prep for the installation of your new toilet. This involves buying a new wax seal, as well as getting some bolts that will hold down your new fixture securely enough so it doesn’t fall over or leak after installation.
3. Install a new wax ring and wax seal.
Clean the wax ring. While you may be tempted to install your toilet with a dirty wax seal, this can damage the new toilet and cause leaks. Before installing, clean the seal with soapy water or rubbing alcohol and then allow it to dry completely before moving on to step two.
Make sure your wax ring is the right size for your toilet flange (the base of your old toilet). You can find out what size flange you need by looking at small numbers or letters stamped into the metal ring on top of your old toilet’s base—or simply by measuring it yourself using a ruler. If there aren’t any markings on yours, measure its width (from side-to-side) instead since all standard American toilets have an 8-inch flange in diameter (this includes both round and elongated bowls).
Once you know what size wax seal will work best for your home improvement project, make sure that it's properly seated inside its corresponding groove around each end of where that piece meets up against other parts underneath. This ensures airtightness which prevents any leakages from occurring.
4. Bolt down the new toilet.
There are many different types of bolts. Be sure to use the right ones for your toilet and your installation. If you're unsure about what type to use, consult with a professional or read the instruction booklet that came with your new toilet. Once you've done that, make sure the bolts are tight and level.
Once all of this is complete, check for leaks around any joints where water might be allowed in (such as between a wall and the floor). Leaks can occur during installation, so always double-check before sealing up anything!
If the toilet is too far gone, you may want to consider replacing the entire floor or wall. In cases like this, you will also want to make sure your Arlington home doesn’t show signs of mold damage. This is where SERVPRO of Arlington/Jacksonville East can help. Give us a call for water damage restoration and mold remediation!
The Non-Plumber's Guide to Replacing a Toilet
8/28/2022 (Permalink)
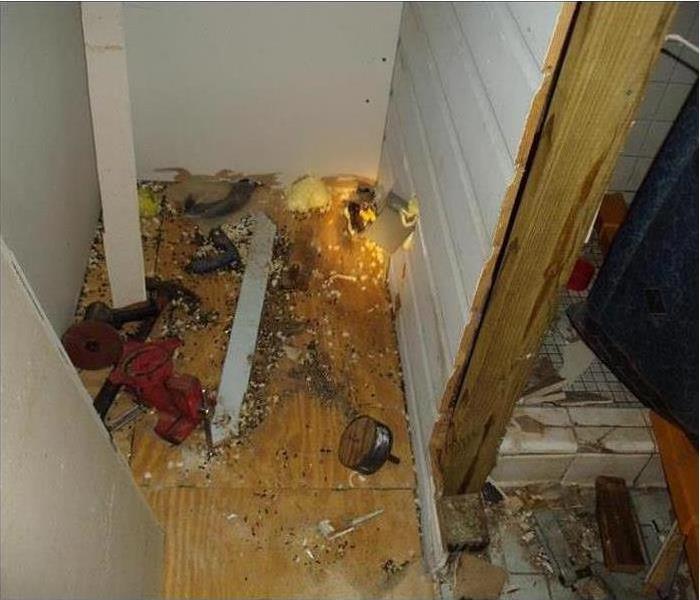 Water damage in a St. Nicholas, FL bathroom home.
How To Replace a Toilet
Water leaks are no fun, and when you discover a leak is coming from a toilet, it can be downright revolting. The good news is that most leaking toilet issues involve clean water, so chances are you can make the toilet repair or swap yourself. That said, if you're not a certified plumber or a handyman, you probably have no clue as to how to replace a toilet. This step-by-step guide should help you.
1. Drain and Remove the Toilet
First things first: Shut off the supply line to the toilet and drain it completely. This is a necessary step if you don't want to cause more water damage or be inundated with a surge of toilet water. Once you've drained the toilet, remove the caps that conceal the closet bolts and detach the hex nuts. Exercising extreme care, lift the old toilet by the bowl and place it on an old towel.
2. Make the Repair
The problem behind a leaking toilet typically stems from the closet flange. If that's the case in your bathroom, scrape away the existing wax gasket. Loosen the bolts that secure the flange to the surface and slide a repair strap beneath it. Center the new wax gasket on the flange.
3. Connect the New Water-Supply Tube and Replace the Toilet
Finally, attach the new water-supply tube to the valve at the base of the toilet tank. Replace the toilet onto the gasket and press down on the bowl to tighten the seal. Secure the closet bolts and then press down on the bowl again. Make sure the nuts are as tight as they can go before covering them with caps. Reconnect the supply line to the shut-off valve, and then reopen the valve. Perform a test flush to check for leaks.
If the water from your leaking toilet has already caused significant damage in your St Nicholas, FL, home, you may want to contact a professional plumber. You should also reach out to your local water remediation team for cleanup assistance.
How Contaminated is Your Flood Water?
2/25/2022 (Permalink)
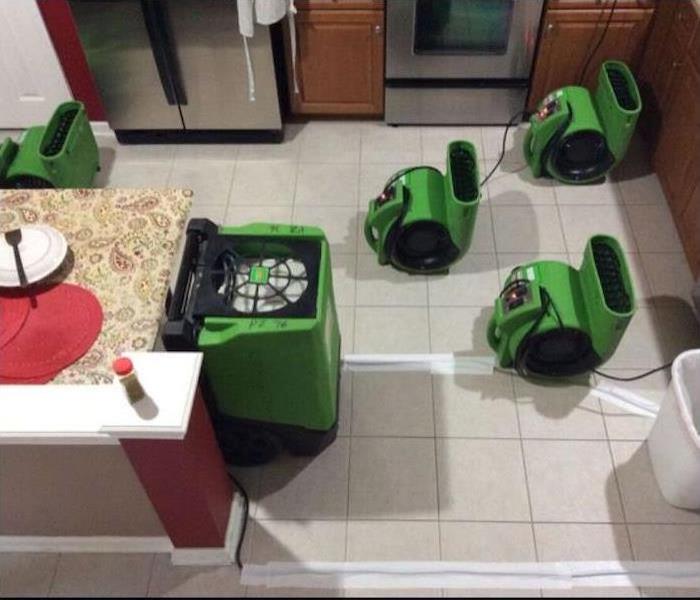 Drying equipment in a kitchen in Jacksonville, FL.
Water Categories
When contaminated water enters your home in Jacksonville, FL, you may begin wondering how dangerous it is to wade into the water. This can depend on your supply line, where the water came from, and other factors. As complex as this can be, there are three main categories of water:
- Clean Water
- Gray Water
- Black Water
While these may seem like meaningless titles, these categories can give you a good idea of how dangerous standing water is.
Clean Water
Clean water, which is also called, “White Water,” is generally considered safe. This is the type of water that you may shower, cook, and clean with. You might face floodwater in this category if a pipe inside your home bursts and does not contact anything else. Generally speaking, you can be safe from contamination when dealing with this type of water.
Gray Water
This water is slightly contaminated, but not necessarily dangerous. That means that gray water may have such particles as human hair, oils, and soap. The important thing is that gray water has not contacted solid human waste. This type of water may come from an overflowing tub or sink, for example.
Black Water
The most important thing about this type of water is that it has encountered solid human waste. Thus, it could be contaminated with harmful bacteria, parasites, toxins, and other dangerous particles. If your toilet overflows or your sewage backs up, you should not go near it. Many people are surprised to learn that flood water that enters your home from outside after a storm is also black water. It can become contaminated water when sewage backs up from the flooding.
No matter what kind of water damages your home in Jacksonville, FL, it’s essential to call a professional restoration company to assist you. All kinds of water can cause mold, and a restoration company can help.
How To Manage Sewage Cleanup in Your Bathroom
2/2/2022 (Permalink)
How to Clean Up Sewage in Your Bathroom
Cleaning up areas of your home after flooding and sewer damage is awful no matter what, but cleaning up the bathroom can be especially tedious. If you ever face a sewage backup in your bathroom, there are a few things that are helpful to know to speed proper cleanup and ensure a safe and sanitary home in Merrill, FL.
1. Call for Help
If you suspect you have damaged sewer lines, call your sewage company to schedule an inspection. To protect your home from future mold or rot issues after a toilet overflow, call flood damage remediation experts. Only with the help of professional water removal specialists can you rest assured that floodwater has not crept into places you can’t see to wreak havoc.
2. Dry the Area
Though you may be tempted to sanitize your bathroom immediately after a toilet overflows, you should not do so before you start drying out the affected area. Whether you are dealing with a flooded toilet or an entire flooded basement, the first thing you should do is utilize heavy duty vacuums, drainage systems and fans to remove all the water.
3. Sanitize
After drying the area, sanitize it as best you can. Floodwater resulting from sewer damage can be toxic, so be thorough in your cleaning processes. Once the area is dry from the first round of sanitizer, you should plan to disinfect it one more time.
4. Dehumidify
The presence of excess water in a bathroom often welcomes lingering humidity, which only encourages mold growth in spaces affected by sewer water. During the process of drying, sanitizing and restoring, you should be sure that a dehumidifier is always running.
Cleaning up the aftermath of sewer damage doesn’t have to be a nightmare. By getting a head start on the problem and calling in the professionals, you can have your home clean and dry again in no time.
No, Your Water Heater’s Noises Are Not Normal
1/26/2022 (Permalink)
Tips On Keeping Your Water Heater In a Good Shape
Polar bears and penguins probably don’t mind taking cold showers. Because you are neither a polar bear nor a penguin, you must keep the water heater in your Fort Caroline, FL, home in tip-top shape. Fortunately, before your home’s water heating system quits altogether, it will likely give you some warning signs.
Signs Your Water Heating System Needs Help
Water heaters usually express signs of distress before they fail completely. If you notice any of the following, your water heating system may be in trouble:
- Leaks
- Corrosion
- Holes
- Noises
- Malfunctions
The Cause of System Sounds
Most water heaters operate without making much noise. If you hear grinding, clunking or other sounds coming from your water heating system, you may need to service it. Often, when sediment accumulates at the bottom of a heater, the unit will emit unpleasant sounds. Scheduling a water heater flush is usually an effective way to remove sediment and restore your unit’s quiet operation.
A Preparedness Plan
If you do not regularly maintain the unit in your home, you may be asking for a flood. After all, leaky water heaters can pump a tremendous amount of water into the living area of your house. While replacing an old, damaged or ineffective system is likely your best strategy for keeping your home in excellent shape, you should have a preparedness plan to address flooding. By working with a water damage repair service, you remove standing water from your home. You also curb mold and mildew growth.
When you step into your shower, you expect a warm and pleasant experience. Naturally, if you prefer not to freeze, you need a water heater that functions optimally. While age, sediment and damage can cause your home’s water heating system to malfunction, you can extend the life of your unit with a bit of maintenance.


 24/7 Emergency Service